
Everything You Need to Know About Tray Loaders
The definitive practical guide for SMT factories, EMS providers, and automation engineers
Table of Contents
- Introduction — what a tray loader is and why it matters
- Typical workflow & place in SMT line
- Tray loader types and common configurations
- Key components and how they work
- Specifications that matter when choosing a tray loader
- Integration with upstream and downstream equipment (pick-and-place, AOI, programming, taping)
- Electrical, mechanical, and software interfaces (protocols, communications, I/O)
- Footprint, layout, and factory planning considerations
- Throughput modelling and capacity planning
- Materials & trays: standards, sizes, and handling best practices
- Programming and recipe management
- Quality, inspection, and traceability features
- Preventative maintenance & spare parts planning
- Common failures, diagnostics, and troubleshooting guide
- Safety and regulatory considerations
- Cost, ROI, and financial justification model
- Case studies & real-world examples (genericized)
- Procurement checklist — how to evaluate vendors
- Future trends: AI, vision, robotic integration, smart trays, IIoT
- Appendix: quick reference tables, sample spec sheet, glossary
1. Introduction — what a tray loader is and why it matters
A tray loader is an automated device used in the electronics manufacturing (SMT / EMS) environment to feed components held in trays (often ICs, QFPs, BGA, connectors, etc.) into downstream equipment — pick-and-place machines, programming machines, test stations, or other handlers. Its core job: reliably present trays or individual components to a downstream process at the correct orientation, pitch, and speed, with minimal human intervention.
Why it matters:
- Replaces repetitive manual handling and reduces human errors (misfeeds, wrong orientation, damage).
- Keeps high-mix, high-volume lines running continuously (supports lights-out).
- Preserves component integrity (ESD-safe handling, anti-static trays, gentle motions).
- Enables traceability (IDs, lot data) when integrated with laser marking and MES.
In modern SMT tail-end automation, tray loaders are a small but critical link: if feed reliability falters, so does the entire production throughput and yield.
2. Typical workflow & place in an SMT line
Typical line sequence (tail-end focus):
- SMT placement machines (pick-and-place) -> reflow -> AOI
- Post-AOI: programming / final test / burn-in / calibration
- Tray loader picks parts from tray to feed programmers / handlers OR it receives parts from pick-and-place output trays for subsequent operations
- After programming/test: tray loader (or separate tray inserter) returns components to trays or to taping/labeling stations
- Laser marking/labeling and final packing/taping
Tray loaders appear in two main roles:
- Input feeder: supply trays to programming/test equipment.
- Output packer: store processed components back into trays for shipping or further processing.
3. Tray loader types and common configurations
Broadly, tray loaders can be classified by function, mechanism, and scale.
By function
- Feeder tray loader: feeds components into a workstation (programmer, handler).
- Return/stacking tray loader: places tested/processed components back into trays.
- Dual-function loaders: capable of both feed and stack, switching modes per recipe.
By mechanism
- Conveyor-based: trays move on conveyors into indexed positions. Good for simple integration.
- Pick-and-place robotic loader: a small robot arm picks from tray and places into workstation — flexible, supports odd shapes.
- Pneumatic pushing / actuator systems: for high-speed, low-complexity handling.
- Rotary carousel / turret: multiple trays rotate into position; useful where multiple tray types or quick changeover needed.
- Indexing tray table: mechanical indexer moves trays stepwise into head position.
By scale & duty
- Bench-top / benchtop loaders: small units for R&D or low-volume programming.
- Inline industrial loaders: full production equipment integrated with SMT line for continuous operation.
- High-capacity loaders: large buffer capacity, multiple tray slots, used in big-volume EMS factories.
Configurations commonly seen
- Single-tray single-station: simplest, 1 tray presented to 1 station.
- Multi-tray multi-station: concurrency and buffering (e.g., 4 trays feeding into 2 programmers).
- Auto changeover loader: swaps trays automatically, useful for mixed-product production.
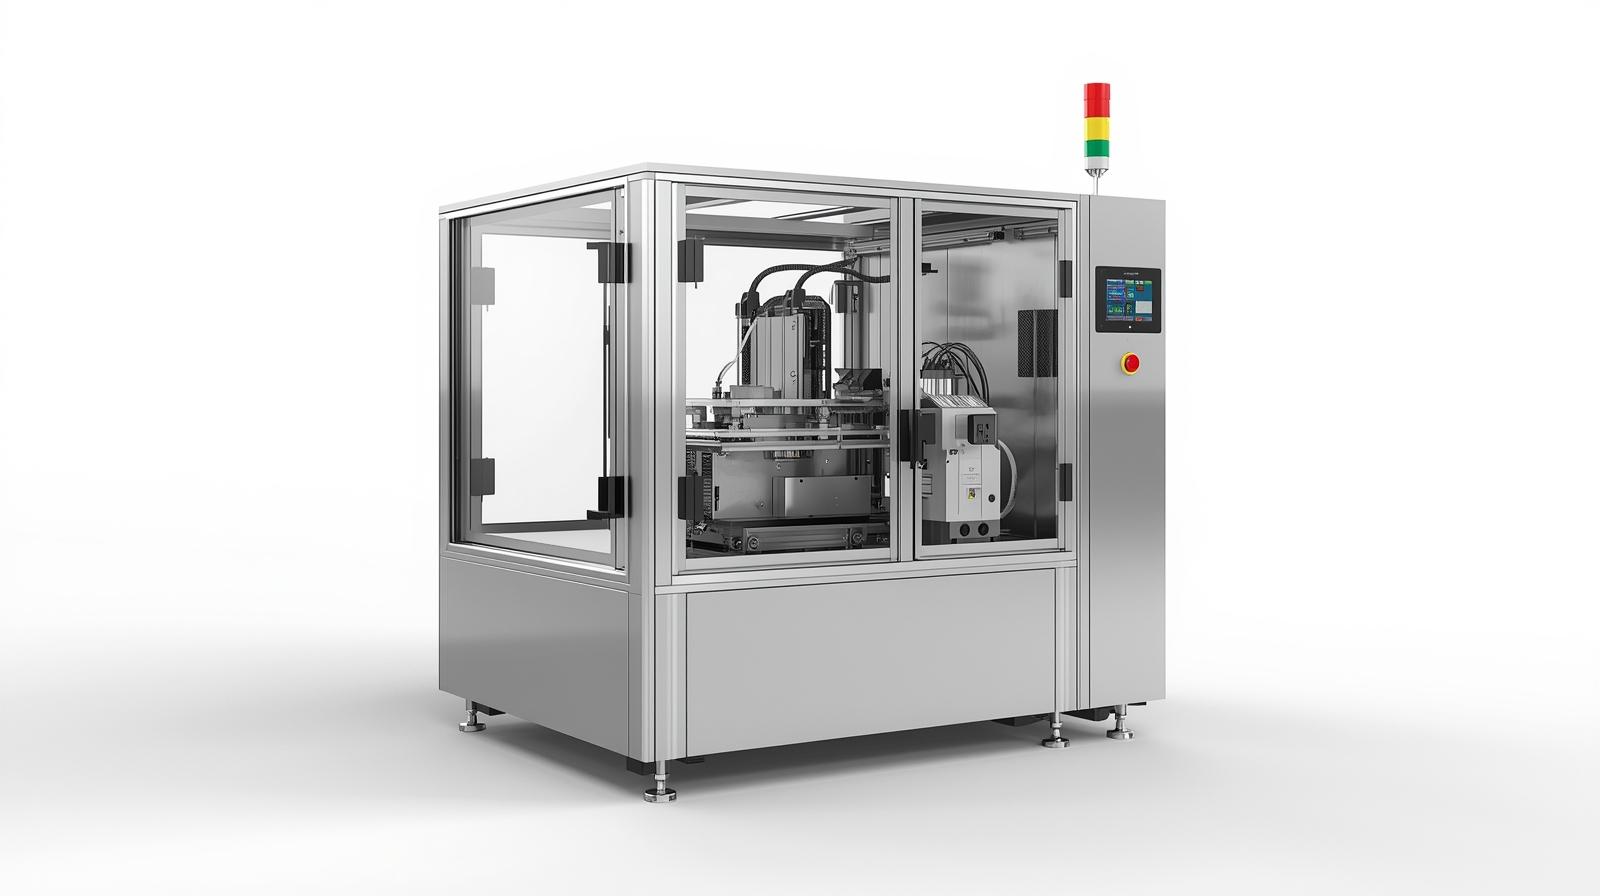
4. Key components and how they work
Understanding component-level architecture helps when selecting or maintaining equipment.
Mechanical frame & chassis
- Rigid structure, anti-vibration design, anchoring points.
- Often stainless or coated steel for durability and grounding.
Tray handling mechanism
- Tray holders / clamps: hold tray securely; adjustable for different tray wall heights.
- Index mechanism: stepper or servo-driven indexing that moves the tray precisely.
- Ejector / pusher: retracts or pushes boards/components as needed.
Pick mechanism (if robotic)
- Vacuum head: for component pick, may have interchangeable nozzles.
- Mechanical gripper: for larger/eccentric parts.
- Parallel gripper or adaptive gripper: for different package sizes.
Conveyor / motorized rollers
- For conveying trays into/out of loader. Motorized belts or rollers with speed control.
Vision system
- Cameras & lighting to check tray presence, orientation, and part position.
- Can verify part integrity before feed (e.g., missing pins, orientation).
Sensors & interlocks
- Tray present sensors (optical or mechanical), door interlocks, ESD detection, safety fences.
Control electronics
- PLC (often Siemens, Mitsubishi, Omron, Delta) or embedded controllers.
- Motion controllers for servos/steppers, IO modules for sensors and actuators.
Human-machine interface (HMI)
- Touchscreen for recipes, status, diagnostics.
Communications module
- Ethernet, EtherCAT, Profinet, RS-232/485, digital I/O — must match line protocols.
Traceability & marking modules (optional)
- Barcode / QR scanner, 2D code reader, label applicator, laser marker for tray or component marking.
ESD & climate control
- Grounding points, ionizers, humidity controls for sensitive components.
5. Specifications that matter when choosing a tray loader
Not all specs are equal; here’s what genuinely impacts ROI and line performance.
Throughput (primary)
- Measured in trays/hour or components/hour. Match to downstream equipment (e.g., programmer cycle time).
- Consider peak vs average throughput; include overhead for changeover.
Tray capacity and buffer size
- Number of trays loader can hold and buffer depth.
- Larger buffers reduce downtime during changeovers or supply delays.
Supported tray dimensions & types
- Standard (JEDEC) trays, custom trays, tape-in-tray, waffle packs.
- Width, length, height ranges; wall thickness tolerances.
Handling speed & index accuracy
- Index time (time to move to next position) and repeatability (± µm or mm).
- Crucial for precise robot pick operations and aligning with testers.
Alignment & positioning
- Fiducial or mechanical references; vision-assisted alignment accuracy.
Changeover time / recipe switching
- How quickly the loader can switch to a different tray type or part number.
- Tools for quick-change fixtures.
Supported part types & sizes
- Small passives (0201) vs large connectors/BGA — require different handling.
Reliability / MTBF
- Mean time between failures; availability figures for production.
Footprint & mounting
- Physical size, mounting holes, conveyor height compatibility.
Power & air requirements
- Voltage, phase, power draw, and pneumatic requirements (pressure, flow).
Environmental tolerances
- Operating temperature and humidity ranges.
Compliance & safety
- CE, UL, RoHS, ESD compliance, safety sensors (light curtains).
Software & integration
- Protocol support (Ethernet/IP, Modbus TCP, Profinet), APIs, MES compatibility.
Cost of ownership
- Initial CapEx, spare parts cost, expected consumables (nozzles, belts), energy consumption.
6. Integration with upstream and downstream equipment
Tray loaders must play nicely with other machines. Integration failure equals line stoppage.
Mechanical alignment and placement
- Conveyor heights must match; use shuttle tables or lift modules when mismatched.
- Mechanical indexes should synchronize with line throughput; use buffer conveyors.
Electrical and communication interface
- Define handshake signals: READY, REQUEST, BUSY, ERROR, COMPLETE.
- Use digital I/O for simple integrations; prefer Ethernet-based protocols for modern lines.
Recipe & part number flow
- MES or line controller should push a recipe to both loader and downstream station.
- Use unique IDs (lot, PO, serial) so loader can tag trays with processing metadata.
Cycle synchronization
- For stations with time-critical operations (programming, ICT), loader must present parts within expected cycle windows.
- Consider a look-ahead buffer so programmer always has the next tray ready.
Material flow & kitting
- Tray loaders often sit near kitting stations. Coordinate kitting so trays are pre-labeled and ready.
Error handling & fallback
- Define fallback processes: if loader fails, how will manual intervention occur without losing traceability?
- Provide manual mode to continue limited operation during loader repair.
7. Electrical, mechanical, and software interfaces
This is the practical integration lingua franca.
Common industrial communication protocols
- Ethernet/IP — widely used in North America.
- Profinet / Profibus — common in Europe.
- Modbus TCP/RTU — simple and common.
- OPC UA — modern, platform-agnostic for MES connectivity.
- RS-232 / RS-485 — legacy point-to-point for printers and some programmers.
Control signals (digital IO)
Typical signals:
- Start / Stop
- Tray present
- Index done
- Error / Fault
- Request part
- Ack / Complete
Mechanical mounting & conveyors
- Alignment tolerances and conveyor guiding rails must be specified.
- Use flexible coupling plates or shim adjustments during installation.
Safety interlocks and E-stops
- Hardwired E-stop circuit required.
- Safety PLC or relay module for redundancy in interlock logic.
Software APIs and recipe formats
- CSV, JSON, XML for recipe exchange — ensure compatibility with MES.
- Recipe items: PN, tray type, orientation, lot number, programming file, test parameters.
8. Footprint, layout, and factory planning considerations
Physical planning avoids surprise costs and downtime.
Height and reach
- Conveyor height standardization (in mm): specify to ensure seamless handoff.
Service access
- Leave space for door opening, motor replacement, and robot reach.
- Clearance for cable runs and pneumatic lines.
Floor loading
- Equipment anchoring points; check floor rating if many heavy machines cluster.
Environmental zoning
- Place ESD-sensitive machines away from high-dust or high-moisture zones.
- Consider separate humidity-controlled rooms for certain components.
Material routing and human ergonomics
- Kitting and replenishment stations should be adjacent to loader to minimize operator walk time.
9. Throughput modelling and capacity planning
Do the math before purchase; match loader to line.
Basic throughput formula
Throughput (parts/hour) = (3600 / cycle_time_seconds) × parts_per_cycle × number_of_stations
Example: If a programmer handles 1 tray of 50 ICs in 60s:
3600/60 = 60 cycles/hour × 50 = 3000 parts/hour.
Bottleneck identification
- Always align loader capacity with slowest downstream operation. Overcapacity in the loader is wasteful; undercapacity causes starving.
Buffer sizing
- Buffer size (trays) should cover downstream batching, changeover delays, and re-kitting intervals.
- Rule of thumb: buffer enough for 10–30 minutes of downstream runtime.
Changeover & mixed-product impact
- High mix increases average changeover time; plan recipes and quick-change fixtures to minimize.
10. Materials & trays: standards, sizes, and handling best practices
Trays are not all equal — handling matters.
Common tray standards
- JEDEC trays: many ICs use JEDEC molded trays.
- Matrix/waffle trays: for BGA, QFN, etc.
- Custom trays: manufacturer specific.
Tray dimensions & design features
- Wall thickness, pocket depth, indexing holes — all matter.
- Look for standardized fiducials or indexing holes for machine alignment.
Tray handling best practices
- Always orient trays consistently (mark orientation fiducials).
- Use anti-static trays and ground straps for ESD-sensitive parts.
- Avoid overstuffing trays — can cause part damage.
Tray lifecycle & inspection
- Inspect trays for cracks/wear; replace if pockets deform.
- Keep trays cleaned (dust-free) to avoid placement or vision errors.
11. Programming and recipe management
Correct recipes = stable lines.
Recipe contents
- Tray type & dimensions
- Part number mapping & orientation
- Number of rows/columns, pocket pitch
- Downstream operation parameters (program file, test routine)
- Traceability fields (lot number, date code)
Version control and change management
- Recipes should be versioned and approved.
- Implement recipe lock (no manual tweak in production without authorization).
Quick-change fixtures
- Use mechanical guides keyed to recipe to reduce human error.
12. Quality, inspection, and traceability features
Quality assurance is non-negotiable.
Vision-based checks
- Tray presence: verify tray seated correctly.
- Part presence: missing or shifted components.
- Orientation checks: pin 1 detection or shape matching.
Traceability
- Read barcode/2D codes on trays; write processing info to tray labels.
- Integrate with MES to log operations, operator, serial numbers, and test results.
Closed-loop handling
- If vision detects a missing part, system can:
- Pause and alert operator
- Flag tray and route to repair station
- Log event for SPC
13. Preventative maintenance & spare parts planning
Planned maintenance avoids surprise stoppages.
Daily checks
- Clean sensors, vision windows, conveyor belts.
- Verify tray clamps and indexers operate smoothly.
- Check ESD grounding points.
Weekly checks
- Inspect belts and rollers for wear.
- Lubricate guides and bearings per manual.
Monthly / quarterly
- Inspect motors, couplings, encoder calibration.
- Check alignment fiducials and recalibrate vision systems.
Spare parts list (recommended)
- Belts, rollers, sensors, solenoids, clamps, nozzles, fuses, encoder modules, common PLC I/O modules.
MTTR planning
- Train spare operators for common repairs; keep critical spares onsite to meet MTTR goals (e.g., <4 hours).
14. Common failures, diagnostics, and troubleshooting guide
Practical field guide — symptoms → causes → fixes.
Symptom: Tray not detected
- Causes: sensor dirty/faulty, tray misaligned, sensor wiring loose.
- Fixes: clean sensor window, check alignment, test sensor continuity.
Symptom: Parts missing while parts exist
- Causes: vision lighting wrong, pocket depth change, tray warped.
- Fixes: recalibrate vision, swap tray, adjust lighting.
Symptom: Index error (motor fault)
- Causes: encoder misread, belt slip, mechanical jam.
- Fixes: home cycle, examine encoder cables, tension belt.
Symptom: Intermittent Ethernet disconnect
- Causes: cable, switch port energy saving, IP conflict.
- Fixes: replace cable, ensure static IP or DHCP reservation, set industrial switch.
Symptom: ESD trip / static alarms
- Causes: grounding broken, ionizer failed, operator wristband not connected.
- Fixes: verify ground, test ionizer, enforce ESD procedures.
Symptom: High scrap after loader adoption
- Causes: incorrect orientation mapping, mis-specified pocket geometry, rough handling.
- Fixes: review recipe, slow down handling, adjust gripper/nozzle pressure.
15. Safety and regulatory considerations
Protect people and product.
Machine safety
- Light curtains, safety mats, door interlocks, hard E-stop circuits.
- Safety PLC for failsafe logic.
ESD safety
- Meet IEC 61340 standards; provide grounding, wrist straps, ionization.
Electrical & CE/UL
- Ensure machine meets local electrical safety standards (CE in EU, UL in US).
Environmental regulations
- RoHS compliance for materials; disposal of consumables per local law.
16. Cost, ROI, and financial justification model
How to justify the purchase to finance.
Components of ROI
- Reduced labor hours (direct savings)
- Increased uptime / throughput (revenue uplift)
- Reduced scrap and rework (cost avoidance)
- Faster cycle time (more units per shift)
Simple ROI model
Net benefit per year = (labor savings + increased revenue + scrap reduction) − (maintenance + consumables)
Payback period = CapEx / Net benefit per year
Example (simplified)
- CapEx: $80,000
- Labor saved: 2 operators @ $30k = $60k/year
- Scrap reduction: $10k/year
- Maintenance & consumables: $5k/year
Net benefit = $65k/year → payback ≈ 1.23 years
Include soft benefits: improved traceability, customer confidence, reduced line variability.
17. Case studies & real-world examples (genericized)
Case A — EMS House (High mix, low volume)
Problem: Frequent changeovers and misfeeds causing rework.
Solution: Modular tray loader with recipe-based quick change fixturing + vision alignment.
Result: 40% reduction in changeover time, 20% drop in rework.
Case B — LED Manufacturer (High volume)
Problem: Large volumes of small packages, manual feeding bottleneck.
Solution: High-capacity conveyor tray loader with multi-tray buffer.
Result: 2× throughput, 30% labor reduction.
Case C — IC Programming Lab
Problem: Programming cycle wasted due to manual tray exchange.
Solution: Inline tray loader integrated with programmer and MES for auto-lot labeling.
Result: Lights-out operation for night shift; 99.8% traceability.
18. Procurement checklist — how to evaluate vendors
Use the following checklist when requesting quotes:
Technical fit
- Throughput match with target cycle time
- Supported tray types & sizes
- Buffer/tray capacity
- Communication protocols supported
Quality & reliability
- MTBF data, uptime SLA
- Spare parts list and lead times
- On-site service availability
Integration & software
- MES compatibility, recipe import/export, API docs
- HMI language options & remote access
Safety & compliance
- Safety certifications, ESD compliance
Commercial
- Warranty terms, training included, commissioning support
- Spare parts pricing & consumable lifecycle
Extras
- Custom fixturing cost, upgrade path, retrofit options
Ask for site references where the same model is in production.
19. Future trends: AI, vision, robotic integration, smart trays, IIoT
Where tray loaders are going next.
AI-enhanced vision & anomaly detection
- Vision systems will not only detect presence but predict failure modes (e.g., gradual shift in tray geometry) using ML.
Robotized flexible handling
- Multi-axis cobots performing delicate picks from trays for odd-form parts.
Smart trays & RFID
- Trays embedding RFID/NFC for instant lot/PN recognition and location tracking.
Edge computing & IIoT
- Local analytics for predictive maintenance (vibration, motor current signatures).
- Cloud dashboards for multi-site fleet management.
Modular, software-defined hardware
- Field-upgradeable modules: add more buffer, add laser marking later.
20. Appendix: quick reference tables, sample spec sheet, glossary
Sample minimum spec sheet (starter)
- Throughput: ≥ 2 trays/min (each tray 50 pcs)
- Tray Types: JEDEC 13 mm–330 mm length, 8–16 mm height
- Buffer: ≥ 6 trays
- Index repeatability: ±0.05 mm
- Vision: 2Mpx camera with LED ring light
- Communications: Ethernet (Modbus TCP, TCP/IP), Digital I/O (24V)
- Power: 220V ±10%, 50/60Hz, 1.2 kW
- Pneumatic: 6 bar, 100 L/min
- Safety: CE, E-stop, light curtain
Glossary (short)
- JEDEC: Joint Electron Device Engineering Council — common tray standards
- MTBF: Mean Time Between Failures
- MES: Manufacturing Execution System
- IO: Input / Output signals
- ESD: Electrostatic Discharge
Final notes — practical tips from the field
- Buy a little more capacity than you think you need. Buffer and contingencies matter.
- Standardize trays and orientation across product families where possible — it reduces recipe complexity enormously.
- Don’t skimp on vision — a good camera and lighting solve more headaches than faster motors.
- Document every recipe change — without version control, traceability is fragile.
- Plan spares for wear items (belts, nozzles, sensors) and measure true MTTR from first installation.
- Include an operator training plan — automation only works well if humans know how to keep it clean and how to perform quick fixes.